Chapter 9 -- MAKING OBSERVATIONS OF MARS
An observer with a well made telescope can contribute valuable Mars observations. However, it is important to learn certain standard techniques and use standard reporting methods so your observations can be compared to and used with reports from observers around the world.
Your telescope must have good optics, it must be properly collimated, and the optics must be clean so they can give the best contrast. You should observe from an open grassy area, away from asphalt, concrete and tall structures that soak up daytime heat and release it at night causing turbulence, or "bad seeing." City lights don't harm planetary observing, so you can observe Mars even from Miami or Los Angeles! But you must allow your telescope to reach outside temperature before attempting any critical observing, and you must conscientiously work at educating your "observer's eye" with lots and lots of observing.
You will need good quality eyepieces, but you don't need the expensive wide-angle types. A set of color filters is tremendously helpful but not absolutely necessary. Color filters increase contrast between areas of differing color, permit you to separate clouds at different levels in a planetary atmosphere, and reduce light scattered from a too-bright planetary image. All told, they increase the sharpness of surface and cloud details you will be trying to observe on the planet Mars.
A yellow filter brightens the ocher-colored Martian deserts and darkens the greenish and brown features. Orange filters increase contrast between light and dark features, penetrates atmospheric haze, and helps you see yellow dust clouds. Red goes even further, yielding maximum contrast of surface features and helping you see dust clouds.
Green, blue, and blue-green filters brighten atmospheric features and darken the surface. Violet filters go even further, bringing out haziness on the limb of the planet, small equatorial clouds, and clouds over the poles.
Used intelligently, filters help you see more than you could any other way. You can buy glass filters from companies that advertise in Sky and Telescope Magazine or obtain gelatin filters from a camera store. Your filter set should include all of the colors mentioned above, plus magenta to enhance polar cap contrast.
Visual planetary observing is a method to acquire knowledge and gain experience in the study of our Solar System. An observer can make drawings and notes of what they see in the eyepiece and do so even if they are not artistic, so to speak. After all, beauty is in the eye of the beholder. There are planetary observers that say they can't draw, so they never even try to make planetary drawings. But drawing planets is not fine art. Instead it's a careful record of what you saw with your telescope. An ugly drawing is just as useful as a masterpiece so don't let any lack of artistic ability stand in your way. Also, at the beginning of an apparition one must go though a period of time to help train the eye in detecting elusive detail. Even an experienced planetary observer needs to practice drawing before they get the hang of it.
One way I have found to practice this is to place an image of the planet on your PC screen and then draw what you see. This method is beneficial because without the problems of bad seeing, telescope tube currents, misquotes nipping at your skin or uncomfortable environmental conditions; one can sit in comfort and draw to their heart's content. Using this method the observer can then consult a chart (map) of the planet and learn the common terminology or gorgon used by the observing community. This is helpful to convey information and also understand what others are seeing and also to develop your own "personal equation."
It is very important that each visual or photographic observation (including CCD images) be accompanied by a written data record made at the time of observation and/or imaging and not left to memory the following day. Whether or not the observations include visual drawings, it is recommended that the following data be recorded:
Recently many amateurs have been using webcams for imaging the planets. These inexpensive little devices do require a computer but are relatively easy to use and, with inexpensive (or even free!) software they can produce striking images of Mars. It is suggested that amateurs wishing to image Mars for the first time try using a web cam.
Universal Date and Time
First, lets see how we find the Coordinated Universal Time (UTC) from our Local Standard Time and in reverse. We will have to know what time zone we live in and if we use daylight savings time or not:
Time Zones in the USA: Time zones are measured from the 0 degrees meridian, somewhere in England, and increases one hour for each 15 degrees of longitude around Earth. This is a general rule. Governments in the various countries attempt to define nature and make laws governing how our clocks will show time. For time calculations we define the times zones in the United States are as follows: Eastern (5), Central (6), Mountain (7), Pacific (8), Alaska (9), and Hawaii (10).
Daylight Savings Time: Here is a function of time that is unnatural for astronomers to use. Daylight Savings Time (DST) is purely a government operation and is set by law for you to change your clocks in March and November of each year. We either "spring forward" one hour (even a half-hour in some countries) on a day in spring and "fall back" an hour during a day in autumn. Some like to call Daylight Savings Time; "summertime." Daylight saving time began in the United States during World War I primarily to save fuel by reducing the need to use artificial lighting. It became a nation ritual during World War II. However, not every state follows this unnatural act.
In the USA all states but Arizona, Hawaii, the eastern zone portion of Indiana, Puerto Rico, the U.S. Virgin Islands and American Samoa practice this unnatural act. That is, change over to DST, during the early hours (2 a.m.) of the second Sunday of March and revert back to Standard Time during the early hours (2 a.m.) of the first Sunday in November.
Coordinated Universal Time: Coordinated Universal Time (UTC) is a system we astronomers use. Also, times for us are usually converted to 24-hour time, i.e., 1 a.m. is 0100 hours, 1 p.m. is 1300 hours and so on. Mid-night or 12 a.m. is 0000 hours, not 2400. To find the UTC for your time zone, simply add the Time Zone values (negative for us), mentioned above, in Time Zones in the USA to your local 24-hour time and if it goes over 24 hours then subtract 24 from that.
Example 1: March 11, 2007, at 3 a.m. Eastern Standard Time the Universal Time (UT) would be. (Note that we have already passed the Daylight Savings at 2 a.m. this day! So, time zone will be 4 hours instead of 5 hours):
Find: 24-hour clock for EST 3: 30a.m. = 0330.Example 2: November 04, 2007, at 9 p.m. or 2100 hours (Note that we have already passed the Standard Time at 2 a.m. this day! So, time zone will be 5 hours instead of 4 hours).
UT for 0330 in the Eastern Time Zone add 4 hours
UT = 0330 +0400 = 0730
Find: UT for 2100 in the Eastern Time Zone add 5 hours;
UT = 2100 + 0500 = 2600.
Normalize by subtracting 2400
UT = 2600 - 2400 = 0200
Some Interesting Web Sites
U.S Naval Observatory’s web page: https://www.usno.navy.mil/USNO
Systems of Time: https://www.usno.navy.mil/USNO/time
World Time Zones: http://www.worldtimezone.com/
Physical Ephemeris of Mars
It is important to note that the observation data for each night (Date U.T.), or for each observing session if the observations are made several hours apart, be recorded on one form. Do not report different dates of observations on the same form. This format and method of reporting your observations will greatly help those interested in reducing your reports for scientific research. It is necessary to first file the reports chronologically in loose leaf binders before analysis can begin.
Windows International Mars Patrol Astronomical Calculator - WIMP: https://alpo-astronomy.org/jbeish/WIMP.pdf
The ALPO Computing Section discusses the WIMP programs, developed in the early 1980's, to provide the ephemerides for Solar System objects and is very accurate for planetary observers. The programs are compiled using MS Visual Basic and works very well in Windows XP through Windows 10
Also, for on-line ephemeris of Mars to web pages:
Also, an excellent program with accurate ephemeris and realistic graphics -- WinJUPOS:: http://www.grischa-hahn.homepage.t-online.de/
Ls -- Longitude of the Sun is measured eastward in the planet's orbital plane from Mars’ Northern Hemisphere vernal equinox. (Also referred to Areocentric Longitude).
De or Sub-Earth Point. The axial tilt of Mars relative to Earth is defined by the declination of the planet Earth (De) as seen from Mars. De is also equal to the areographic latitude of the center of the Martian disk, which is known as the sub-earth point. ("Areo-" is a prefix often employed when referring to Mars or "Ares.") The latitude is (+) if the north pole is tilted toward Earth and (-) if the south pole is tilted toward Earth. This quantity is an important factor when drawing Mars or when trying to identify certain features.
Ds or Sub-Solar Point. The axial tilt of Mars relative to the Sun is defined by the declination of the Sun (Ds) as seen from Mars. The Sub-Solar Point (Ds) is (+) if the north pole is tilted toward the Sun and (-) if the south pole is tilted toward the Sun. This quantity is an important factor when drawing the phase terminators of Mars or when the polar caps may or may not be in Sunlight.
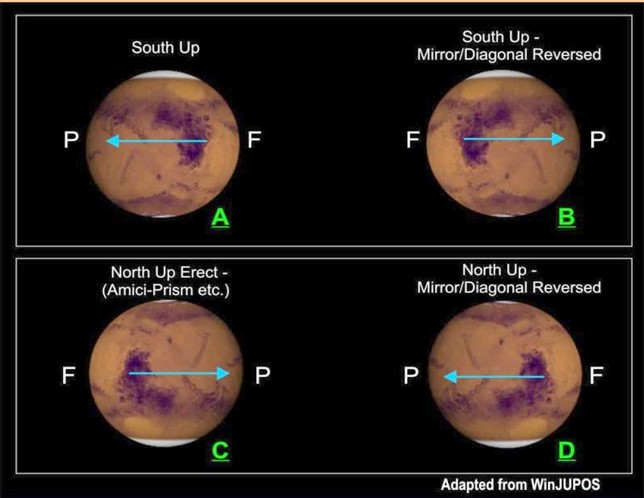
The terminator (phase defect) is the line where daylight ends and night begins The phase , or defect of illumination, is given in seconds of subtended arc on the apparent disk, or in degrees (i), or the ratio (k), to define how much of the Earth-turned Martian disk is in darkness. The sunset terminator appears on the Areographic eastern side, or evening limb, before opposition; after opposition, the terminator becomes the sunrise line on the Areographic western side, or morning limb. At opposition, there is no perceptible phase defect (See Figure 9-1).
Figure 9-1. The orientation and nomenclature of the globe of Mars as seen from Earth through an astronomical telescope. All figures indicate Mars is observed before opposition. With the clock drive off an image in the eyepiece always DRIFTS to the West. Mars always rotates from the morning limb (Following) to the evening limb (Preceding). Figure 3A indicates a "simply inverted" view and Figure 3B shows an inverted, mirror/diagonal reversed view; where South Pole of Mars is at the top. Figure 3C shows a magnified Amici-Prism view of Mars as one would it as a "naked eye" object with the North Pole at the top. Figure 3D an erect, mirror/diagonal reversed view of the Planet Mars. Illustration by David Gray (BAA Contributor).
The Martian Central Meridian (CM), an imaginary line
passing through the planetary poles of rotation and bisecting the
planetary disk, is used to define the areographic longitudes on
the disk during an observing session. It is independent of any
phase that may be present; if Mars presents a gibbous phase, then
the CM will appear to be off center. The CM is the areographic
longitude in degrees, as seen from Earth at a given Universal
Time (U.T.). It can be calculated by adding 0.24°/min., or
14.6°/hr., to the daily CM value for 0h U.T. as listed in
The Astronomical Almanac
).
|
|
|
|
|
|
|
|
|
|||
|
|
|
|
|
|
|
|
|
|||
|
|
|
|
|
|
|
|
|
|||
|
|
|
|
|
|
|
|
|
|||
|
|
|
|
|
|
|
|
|
|||
|
|
|
|
|
|
|
|
|
|||
|
|
|
|
|
|
|
|||||
|
|
|
|
|
|
|
|||||
|
|
|
|
|
|
|
|||||
|
|
|
|
|
|
|
|||||
|
|
|
|
|
|||||||
|
|
|
|
|
|||||||
|
|
|
|
|
Example: 0h UT CM = 351.5. At 1413UT CM = 351.5° +
204.69° + 2.44° + 0.73° = 559.36° -
360° = 199.36°
Sketching the Globe of Mars
The ancient art of visual observation at the telescope is still a most useful tool for the modern astronomer, and is the forte of the amateur astronomer. This year we are fortunate in that Mars will be very favorably positioned for telescopic study. This is especially important in view of the space missions to Mars currently under way and those planned for the rest of this century.
Anyone who observes Mars will find it rewarding to make a sketch of whatever is seen, both to create a permanent record and to help train the eye in detecting elusive detail. My drawing equipment consists of a metal clipboard, two pencils, a blending stump, night light with red lens cover and a 5" x 7" index card. This one has a hook attached to hang the clipboard to something nearly.
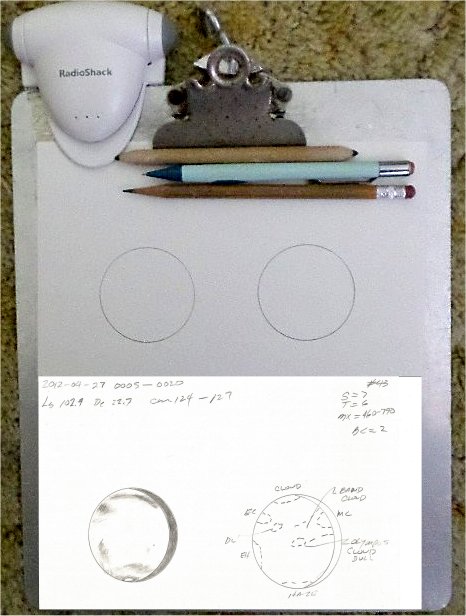
Figure 9-2. Metal clipboard, clip-on night light, blending stump, two pencils and 5"x7" index card. Sample Mars observation included.

Figure 9-3. 16.4 arcsec Mars on August 15, 2020. The terminator or Position Angle of Defect was 250.7° from the North Point to the point of maximum defect.
Start with a circle 1.65-inch (42 mm) or 2-inch (50.8 mm) in diameter. Draw the phase defect, if any, and the bright polar caps or cloud hoods. Next, shade in the largest dark markings, being careful to place them as accurately on the disk as possible. At this stage, record the time to the nearest minute. Now add the finer details, viewing through various color filters, starting at the planet's sunset limb. Finally, note the date, observer's name, the instrument(s) used, and any other relevant information.
Index cards are perfect for planetary sketching. Put one observation on each card, and be sure to include all relevant information on the card. Cards are convenient at the telescope, easy to stuff in the pocket of your shirt or coat, and easy of light on the sunrise or sunset limb of Mars. It appears at the limb because there the observer looks through a long path in the upper Martian atmosphere, which may contain carbon dioxide crystals, fine dust, cirrus-type water clouds, or a mixture of these. Consequently the presence of limb haze is a very sensitive way to detect unusual weather activity or polar phenomena. When you see haze, note its location, color, and density, as well as the filters used to see it.
At the beginning of an observing session, center Mars in the field of the eyepiece and obtain a sharp focus using the planetary limb, polar cap, or a large, dark, central feature. Make an overview of the general appearance of Mars, and estimate the quality of seeing (0 - 10 scale) and atmospheric transparency (0 - 6 scale). Note the phase and the planet's axial tilt relative to your field of view. Identify familiar surface features with the aid of a yellow or red filter. Locate clouds and limb hazes with a blue filter.
Compute and note on your card the starting and ending times
and the Central Meridians (CM) that are on the Martian disk in
order to recognize the gross features which you have just seen.
Locate and draw the outline of the bright North Polar Cap at the
bottom of the drawing disk. If the South Cap in present, locate
it at the top. If a polar hood is seen, sketch in a dashed
boundary outline of the proper size. Using the centers of both
the telescopic image of Mars and the pencil disk as references,
carefully draw in the darkest or largest feature relative to the
center of the disk. Using the north and south points of the disk
and the plotted dark feature as perspective guides, locate and
sketch other dark features. Use a
tortillion or blending stump to smooth out the sharp
boundaries and smooth out the finer details.
This process should take no longer than 10 or 15 minutes with
fair seeing. You now have 40 to 50 minutes to study Mars
with the aid of color filters for fine surface details, bright
frost patches (indicate with dotted out-lines), white or blue
clouds (use dashed outlines), and yellow dust clouds (dashed
outlines). Sketch them at their proper positions on the
drawing disk before they rotate off the Martian
disk.
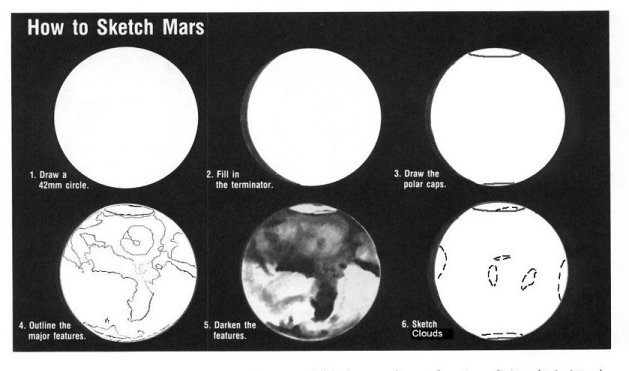
Figure 9-4. Sequence for sketching Mars. Suggestions for a six steps drawing sequence of Mars at the telescope; 1) Draw 42mm or 50mm circle. 2) Draw phase terminator, if present, 3) draw polar cap(s), south at the top and north at the bottom, if either or both visible, 4) fill in rough outline of surface features, 5) darken familiar features and fine details, and 6) draw in clouds/haze detail in separate drawing disk. Drafted by J.D. Beish
Fogs and frosts, often called bright patches, form in the
chill of the Martian night, rotate with the planet, bake off in
the morning sunlight, and usually disappear by local noon. You
can tell them from elevated clouds by examining them with blue,
blue-green, and yellow filters. High clouds look brightest with a
blue filter, while low-lying fogs look brighter with a blue-green
filter than they do in a blue or a yellow filter. Surface frost
looks brightest in green and yellow filters and is hard to see
with a blue filter.
The behavior and location of bright patches also help distinguish these patches from clouds and limb haze. Fogs normally form in valleys, linear depressions, basins, and on upper slopes. Frosts are usually seen on deserts, plateaus, mountains, and floors of large craters. Pinpointing the location and seasonal occurrence is important to the study of Martian weather patterns.
Mars normally shows only a bright, featureless disk in violet light because the Martian atmosphere scatters short wavelengths. When a violet clearing occurs, the large, dark surface features can be seen through the atmosphere with a Wratten 47 filter. Although the debate over the cause of this phenomenon has raged for decades, no explanation of violet clearing is generally accepted.
OBSERVING FORMS
For those unfamiliar with the terms we use on the observation forms I will try to point out some of the information the ALPO Mars Section would like for observer to enter on the forms. Much of it is not absolutely necessary because the person who evaluated the reports is capable of figuring it out for themselves; however, when dealing with a large volume of reports it is helpful to have the information right there on the report form. Detailed descriptions and discussions will be covered on the:
Association of Lunar and Planetary Observers (ALPO): https://alpo-astronomy.org/
Select the Mars Section and you will find the Sample Mars Observing Form and Blank Mars Observing Form.
First and most important is for the observer’s name to appear somewhere on the form. The number of reports we get with no name on them may surprise you. That also applied for images or phonographs as well. The date and time of observations is also important. Since we use astronomical date and time it would be nice for observers to learn how to determine these values from their local date and time.
MODERN DIGITAL PROCESSING FOR ELECTRONIC IMAGING
Amateur astronomers have been photographing the planets for more than a century and reached an impasse when progress in using film may have slowed to a halt. Clever innovators had pushed films, cameras, exposure techniques and processing to the limits when along came CCD camera, followed by even more impressive performances by the CMOS camera that started to revolutionize astronomical imaging. In the early days not many amateurs had the funds to buy these new gadgets and lacked the training in their use. Then a simple PC camera device began to be used for personal communications on the Internet that proved within our budget.
We had been using a 35mm camera for years and various films to image Mars our photos still lacked the desired resolution and detail, so the next attempts were in electronic imaging using a computer and a web camera. Enter the web camera (WEBCAM) and a revelation in planetary photography was born. Of course, the electronic imaging technology has advanced considerably since our first attempts with the Webcam. To use the "movie" data produced by the Webcam data files some creative computer programmers began producing methods of stacking the thousands of frames to produce a single high resolution image of Mars. The mechanics of producing the "movie" files will be not be discussed here.
First, methods of enhancing photographs made by film were being created by professional planetary imagers who were nice enough to share their work with amateurs. An great example of this cooperation is published in the following article Images of Some Martian Volcanoes.
After years of experimenting with image enhancing and the sharing of methodology amateur astronomers began using this technology to invent new imaging systems and programming techniques that we see today all over the Internet. One can see the results and join in with the fun using modern free software available on the Internet; but first, let us read some excellent examples of how one should image Mars. Now that we have jumped ahead let's start over at the beginning. Using a popular electronic digital camera here is an excellent tutorial that will no doubt make you an expert image taker.
go Chapter 8 << Contents >> Chapter 10